 Localino MeshTransfer
Setting up the Mailbox
From a bare ESP32-CAM to a station that keeps every message: install the firmware, connect your radio, join your Wi-Fi and point your apps at the Mailbox. About half an hour.
Start hereWhat the Mailbox does
Contents
- How the Mailbox fits in
- What you need
- Get the firmware
- Install the firmware
- Connect the radio
- Join your Wi-Fi
- Connect your apps
- Everyday use
- Options
- Starting over
- Troubleshooting
How the Mailbox fits in
What you need
A Mailbox board
An ESP32-CAM with its USB programmer board (ESP32-CAM-MB). Optionally a microSD card, FAT32-formatted, for a much larger buffer.
A Meshtastic radio
Meshtastic firmware 2.5 or later, for example a Heltec V3 or a RAK4631. You configure it with the Meshtastic app as usual.
Computer, cable, power
A computer with Chrome or Edge, a USB cable that carries data (not a charge-only cable), a USB power supply with 5 V and at least 1 A, and three jumper wires for the cable connection.
1Get the firmware
The firmware comes with your personal download link: enter your e-mail address and you receive a link by e-mail. On the download page choose mailbox-full_1.2.bin. The link is valid for 48 hours.
mailbox-full_1.2.bin holds all the board needs: the
start program (bootloader), the memory layout and the Mailbox itself, each at its proper place. That is why it is
written in one go, starting at address 0x0.2Install the firmware
With Espressif's web flasher, directly in the browser. Nothing needs to be installed except, on Windows, possibly a USB driver.
- Prepare the board. Plug the ESP32-CAM onto its programmer board (ESP32-CAM-MB), with the pins fully seated. Take out the microSD card for now.
- Connect it. Connect the programmer board to your computer with the USB cable. On Windows a new COM port should appear in the Device Manager (e.g. “USB-SERIAL CH340 (COM5)”). If none appears, install the CH340 driver from the manufacturer of the programmer board, or try another cable.
- Open the web flasher espressif.github.io/esptool-js in Chrome or Edge on a computer. Firefox, Safari and phones cannot talk to USB devices this way.
- Connect. Under Program set the baud rate to
460800and click Connect. Choose the port of the board (the CH340 or COM entry) and confirm. The log below then shows the chip, e.g. “Chip is ESP32-D0WD”. If it cannot connect: hold the IO0 button on the programmer board, press RST briefly, release IO0, and click Connect again. - Erase. Click Erase Flash and wait until the log reports that it is done (about 10 to 30 seconds). This removes everything that was on the board before and gives the Mailbox a clean start.
- Choose the file. In the row below, enter Flash Address
0x0and choosemailbox-full_1.2.binwith Choose File. Leave all other rows empty. - Program. Click Program. A progress bar runs; it takes about a minute. Wait until the log says the writing is finished.
- Start. Click Disconnect, then press RST on the board or unplug and replug the cable. After about ten seconds a new Wi-Fi network MeshTransfer-Mailbox-XXXX appears. The firmware is installed.
0x0 and only this one file. If the board does not start after
programming, or restarts again and again, the file was most likely written to a different address. Simply repeat
steps 4 to 8 – erasing first sets everything straight.Want to watch the Mailbox start? After Disconnect, open the Console section of the web flasher at 115200 baud and press RST. The Mailbox prints its start messages there, including its password.
3Connect the radio
By cable – the recommended way. For Wi-Fi or Bluetooth skip to step 4 and choose the connection in step 5.
| Mailbox board | Mailbox TX → radio RX | Mailbox RX ← radio TX | Ground |
|---|---|---|---|
| ESP32-CAM | GPIO14 | GPIO13 | GND |
| ESP32-CAM with microSD card | GPIO12 | GPIO13 | GND |
On a Heltec V3 the radio side is GPIO47 (RX) and GPIO48 (TX). Both boards work with 3.3 V signals, so no level shifter is needed. Never connect GPIO12 of the ESP32-CAM to anything that pulls it high at power-up.
Then, in the Meshtastic app connected to the radio directly, under Module configuration → Serial:
| Serial enabled | on |
| Mode | PROTO |
| Baud rate | 115200 |
| RX / TX pin | 47 / 48 on a Heltec V3, see your radio's pinout otherwise |
Save; the radio restarts.
4Join your Wi-Fi
- On your phone, connect to the Wi-Fi MeshTransfer-Mailbox-XXXX with the password
meshtransfer. - Your phone offers Sign in to network. Tap it and the Mailbox page opens. If not, open
http://192.168.4.1. - The setup page signs you in automatically. Set your own password under Settings → Password; the Mailbox then asks you to sign in with it, from now on also on its setup network.
- Under Settings enter your home Wi-Fi and save. The Mailbox restarts and joins it.
- From now on open
http://meshtransfer-mailbox.local, or the address your router lists for the Mailbox. Android phones often need the address.
5Connect your apps
All apps connect to the Mailbox over Wi-Fi – with its address, not the radio's.
Radio by Wi-Fi or Bluetooth
Only if you did not use a cable: Settings → Connection to the radio. For Wi-Fi enter the radio's address. For Bluetooth tick Enable Bluetooth, save, then Scan for devices, pick your radio and save again. Disconnect your phone from the radio first, otherwise the radio is invisible. On the radio, set Bluetooth pairing to Fixed PIN with the same PIN as in the Mailbox, or to No PIN.
MeshTransfer
Choose the network connection (IP) and enter the Mailbox address followed by :8080, for
example 192.168.178.47:8080. The app shows via MeshTransfer Mailbox next to the firmware.
Meshtastic app
Add a network device. The Mailbox usually appears in the list by itself; otherwise enter its address with port 4403. The app then works as with a radio in your network.
Everyday use
- ✓New mail
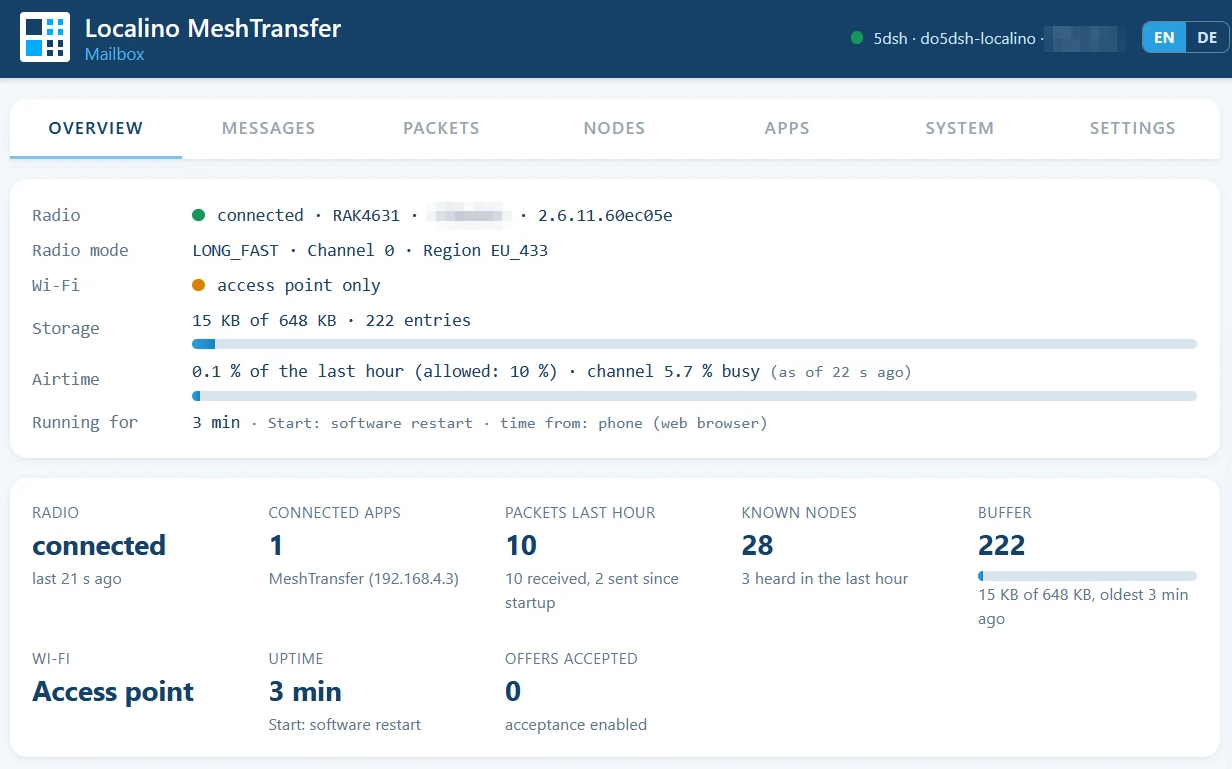
When a message or file offer arrives, the header of the web interface shows ✉ New mail and the LED of the ESP32-CAM flashes twice every two seconds, until an app fetches it or you open the messages. - ✓Fetched or not
Every message shows which app fetched it and when: ✓ MeshTransfer 19:12. - ✓Reply from the browser
Messages → Send a message, or Reply on any received message. Up to 200 bytes; the delivery status appears under Sent. - ✓Language
EN | DE in the header switches the interface between English and German.
Options
| Setting | What it does |
|---|---|
| Mailbox has priority for file reception | The Mailbox accepts every broadcast file to you, even while MeshTransfer is connected. The app fetches it later. |
| Buffer on microSD card | Up to 64 MB instead of the internal storage. Move the TX wire from GPIO14 to GPIO12. |
| Delete entries after | Stored entries are deleted after this many days. Default 30, 0 keeps them. |
| Enable Bluetooth | Off by default. Switched off, Wi-Fi has the antenna to itself and responds faster. |
| Show new mail on the LED | The double flash for new mail. On by default. |
Starting over
Forgot the password or Wi-Fi?
Hold BOOT (IO0) for 5 seconds. The Mailbox forgets its Wi-Fi and opens its setup network again, where you are signed in without a password. Stored messages and other settings are kept.
Back to factory state
Repeat step 2 with Erase Flash. Everything is removed – settings, password and all stored packets – and the Mailbox starts like new.
Troubleshooting
| Problem | What to check |
|---|---|
| The web flasher finds no port | Use Chrome or Edge on a computer. Try another USB cable – many only charge. On Windows install the CH340 driver. |
| Connect fails or times out | Hold IO0, press RST briefly, release IO0, connect again. If it still fails, choose baud rate 115200. |
| After programming no Wi-Fi appears, or the board keeps restarting | Repeat step 2: Erase Flash, then mailbox-full_1.2.bin at address 0x0. Take out the microSD card. Use a power supply with at least 1 A. |
| Radio shows no data | TX and RX crossed? Ground connected? Serial module of the radio in mode PROTO at 115200 baud? |
Mailbox not found at meshtransfer-mailbox.local | Use the address from your router's device list. Many Android phones do not resolve .local. |
| Bluetooth finds no radio | Disconnect your phone from the radio; a connected radio is invisible to others. Is Bluetooth enabled on the radio? |
| Bluetooth: PIN rejected | The radio is set to Random PIN and makes up a new PIN for every pairing. In the Meshtastic app under Settings → Bluetooth choose Fixed PIN with the same PIN as in the Mailbox (default 123456), or No PIN. |
| Wi-Fi feels slow | With Bluetooth enabled, Wi-Fi and Bluetooth share the antenna. Use a cable and switch Bluetooth off. |
| Overview warns about the microSD card | Insert a FAT32-formatted card and restart. Until then the buffer runs in internal storage. |
Ready
Your radio now keeps watch around the clock. Messages and broadcast files wait in the Mailbox until your phone is back in the Wi-Fi.
Download the appMeshTransfer and MeshTransfer Mailbox by Localino. Meshtastic® is a registered trademark of Meshtastic LLC; MeshTransfer and the MeshTransfer Mailbox are independent products and not affiliated with Meshtastic LLC.